Android RecyclerView – ItemDecoration and ItemAnimator
In the previous post of the series I covered the basics of how RecyclerView works and how to create an Adapter. In this post we will look at how to use ItemDecoration to decorate the child views and ItemAnimator to animate them.
ItemDecorator
- onDraw
- onDrawOver
- getItemOffsets
onDraw
Canvas, the RecyclerView itself and State. The decorations are drawn on the canvas. The RecyclerView instance can be used to get the child views and total count. The State instance is a class that stores information like scroll positions in RecyclerView and other data.onDrawOver
getItemOffsets
    @Override
    public void onDrawOver(Canvas c, RecyclerView parent, RecyclerView.State state) {
        int count = parent.getChildCount();
        int width = parent.getWidth();
        for (int i = 0; i < count; i++) {
            View child = parent.getChildAt(i);
            int bottom = child.getBottom();
            c.drawRect(0, bottom, width, bottom + DIVIDER_HEIGHT, paint);
        }
    }
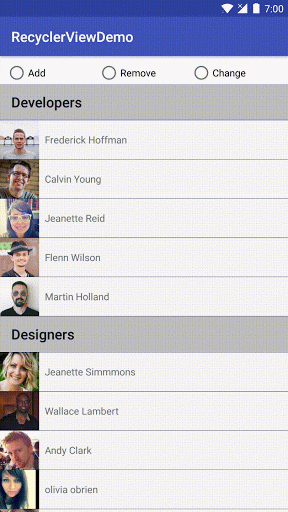
In the code, based on the child count, the line is drawn at the bottom of each child view. The divider has the width equal to screen width and height of 1px. This is how it looks like:

Next we will look at some built-in animations available in RecyclerView.
ItemAnimator
DefaultItemAnimator class. So no need to do any extra configuration to add it.1. Addition
You can initiate an addition animation by adding new item to the data supplied to the adapter and notifying it for insertion. The default addition animation uses fade-in to add a new child view. This addition animation is based on predictive animation where adding a new item at a position causes other items to move to make way for it.
Here is the code that initiates addition animation by adding a new User to an ArrayList:
    User newUser = new UsersData().getNewUser();
    adapter.addNewUser(position, newUser);
    adapter.notifyItemInserted(position);
2. Removal
notifyItemRemoved() with the position of the item that is to be removed. The default animation fades-out the view to be removed. It also causes child views around it to move and fill the empty area. Checkout the code below.
    adapter.removeUser(position);
    adapter.notifyItemRemoved(position);

3. Change
notifyItemChanged() method. Below is the code.
    adapter.changeUser(position);
    adapter.notifyItemChanged(position);
changeUser method I am changing the username and user image url at the particular position in the ArrayList.
4. Move
User item from position 3 to 6. Then to reflect it in UI, use the adapter's notifyItemMoved() method passing in the initial and final positions. The move animation is a translate animation.
    if (position != RecyclerView.NO_POSITION) {
        //...
    }
Checkout the DefaultItemAnimator class for more info. If you want to use custom animations subclass either DefaultItemAnimator or ItemAnimator class. Or else, use this awesome library https://github.com/wasabeef/recyclerview-animatorsCheckout the source code here.
In the next post we'll see some advanced RecyclerView use-cases.